Dark Mode
Project: Shopfront CMS - Final
Intro
Wow this has been such a long ride and honestly has made for an extremely fun project. The ups were really high up and the lows were extremely low. Moments of complete despair coupled with moments of pure elation. I feel like thus is the norm with coding.
Well the project is basically finished. I have finalized the folder layout, backend structure, payloads, and tried my best to refactor where I could. Now again I must state some facts for the record and to anyone who has simply jumped to the end to see the result.
About Me
- I am a junior developer
- I struggle with documentation
- I am also a novice writer
Application Stack
- React.js
- MySQL
- Sequelize
- Node.js
- Express
- TailwindCSS
Alright now that we've gotten that out of the way, lets jump into the project.
Folder Structure
This entire project was a learning experience starting with the folder structure. About 2/3 of the way through the project I was looking through some projects on github and saw some interesting backend layouts. I thought to myself what?! Why have a folder for your route code and a separate file where you specify your routes??
MVC was the reason and as I dug deeper into the concept I became enamored. Different code layouts existing so that you could be more literal in your declarations. Separate API folder which houses all the API dependant code similar to the client folder for the frontend.
API Layout
/API
    /config
        /connection.js
    /controllers
        /categoryController.js
        /clothingController.js
        /orderController.js
        /userController.js
    /models
        /Category.js
        /ClothingItem.js
        /ClothingStock.js
        /Color.js
        /index.js
        /Order.js
        /Shipping.js
        /User.js
    /routes
        /category.js
        /clothing.js
        /index.js
        /orders.js
        /users.js
    /seeds
        /index.js
        /seedData.js
    /validate
        /userValidate.js
All of this coupled with the server.js file at the root directory of the project make up the backend of my CMS project.
Now I know it isn't anything revolutionary but i'm hoping it is concise and to an extent easy to navigate following MVC formatting.
Client Side Layout
/client
    /node_modules
    /public
        /favicon.ico
        /index.html
    /src
        /components
            /CreateModal
                /CreateModal.js
            /EditModal
                /EditModal.js
            /InventoryItem
                /InventoryItem.js
            /LoadingDefault
                /LoadingDefault.js
            /LoadingIcon
                /LoadingIcon.js
            /OrderItem
                /OrderItem.js
            /OrderModal
                /OrderModal.js
            /popupModals
                /confirmModal.js
            /SideBar
                /MobileSideBar.js
                /SideBar.js
            /UserItem
                /UserItem.js
            /VariantComponents
                /AddVariant.js
                /CurrentVariant.js
        /pages
            /InventoryPage.js
            /MainPage.js
            /SoldPage.js
            /StatsPage.js
            /UserPage.js
        /utils
            /helpers
                /categoryStats.herlpers.js
                /productStats.helpers.js
                /shippingStats.helpers.js
        /App.js
        /index.css
        /index.js
        /reportWebVitals.js
        /setupTests.js
    /.gitignore
    /package-lock.json
    /package.json
    /postcss.config.js
    /README.md
    /tailwind.config.js
So the main thing you're probably noticing is the weird format for my components layout. Usually when working with CSS I would have an individual style sheet per component and then add that into the folder so I don't have to deal with one single extremely long app.css or something similar. Since I am using TailwindCSS and the CSS is all inline it makes things a bit easier but nonetheless it does make it convenient if there are any similar components that I can group in a single folder.
The utilities/helpers folders facilitate some refactored code that Ive used in the statistics page and as there is no need for the context API I have no context folder.
Functionality
So at the beginning of this project I was thinking of creating a content management system, as I had never really fully designed my own. I had one sort of simple goal in mind. Be able to add/delete/update clothes in a clothing store. The premise was seemingly simple but then it became more of a numbers game.
How much stock is there of each item? How many versions of that item are there? Shouldn't each version have its own stock amount?
Ultimately I settled on clothing items with variants. Each variant has its own stock numbers per size. Sizes ranging from extra small to extra large. From there you have categories that each item is placed in. Those categories being determined by the store owner.
The next slight intricacy was handling the order process. I needed users to mock orders, then I needed to keep track of orders. The orders also have their own shipping which has its own price and cost depending on the rate chosen. Users have orders which have shipping which culminates into a total price/cost.
Database Architecture
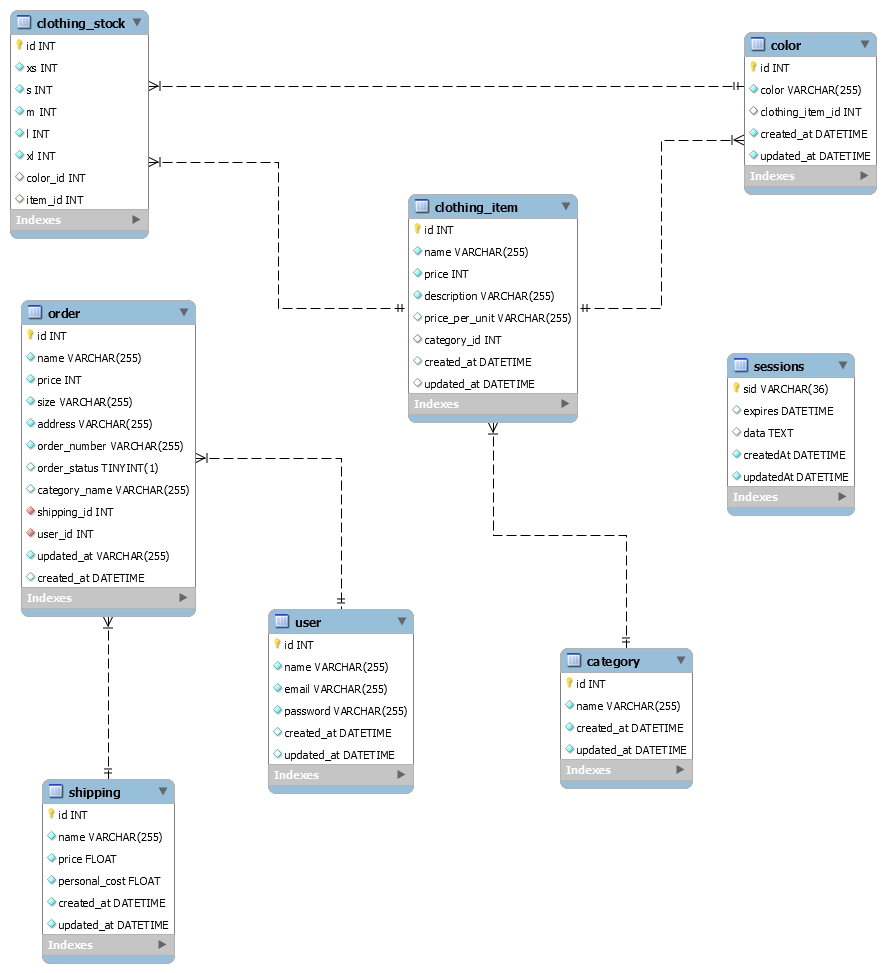
Here is a diagram presenting the schema for the database. Which adds a bit of context to the description given in the previous functionality section.
So starting with the star of the store, a clothing_item has a name, price, and description all fairly self explanatory. Price per unit entails the price the store pays per item.
Each clothing item can have many color which has a name and essentially links the clothing item to its stock values. clothing_stock contains the extra small through extra large integers as well as references to the clothing_item and color tables.
Now onto the order table. This table contains all of the information a user would put in at checkout creating an order object which is essentially read as a receipt.
- name being the items ordered
- price being the total prices
- size being the size of the items ordered
- address being the address to ship to
- order_status is a boolean that indicates whether or not an order has been fulfilled or not.
- category_name is the name of the category the item/items are from. This isn't particularly needed and is more for the backend.
- shipping_id references the shipping table determining which shipping option was chosen.
- user_id references the user table, a many to one relationship.
- updated_at in this specific case is a string that is determined at checkout not at the creation of the object, as opposed to the default sequelize updated_at column.
Now the user table. This holds simple user login information. Name, email, pasword. The user is the main proprietor of the order and shipping tables. You need a user to make orders. The shipping table can exist on its own however.
The shipping table contains the name or type of shipping, a price and then the cost to the store to enact that form of shipping.
Usage - Inventory
So now that we have discussed the way the backend works let me go over the frontend.
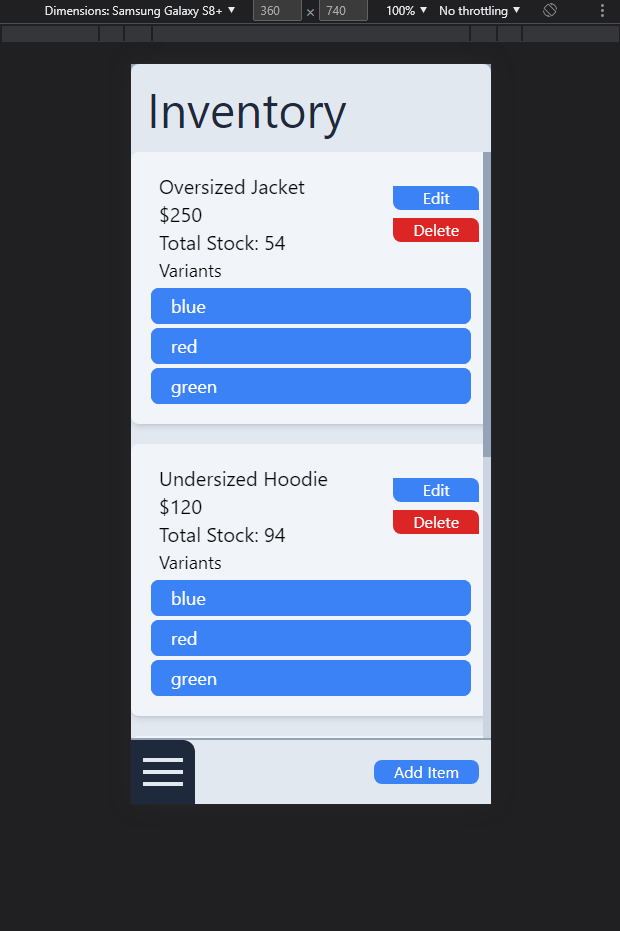
Inventory Page
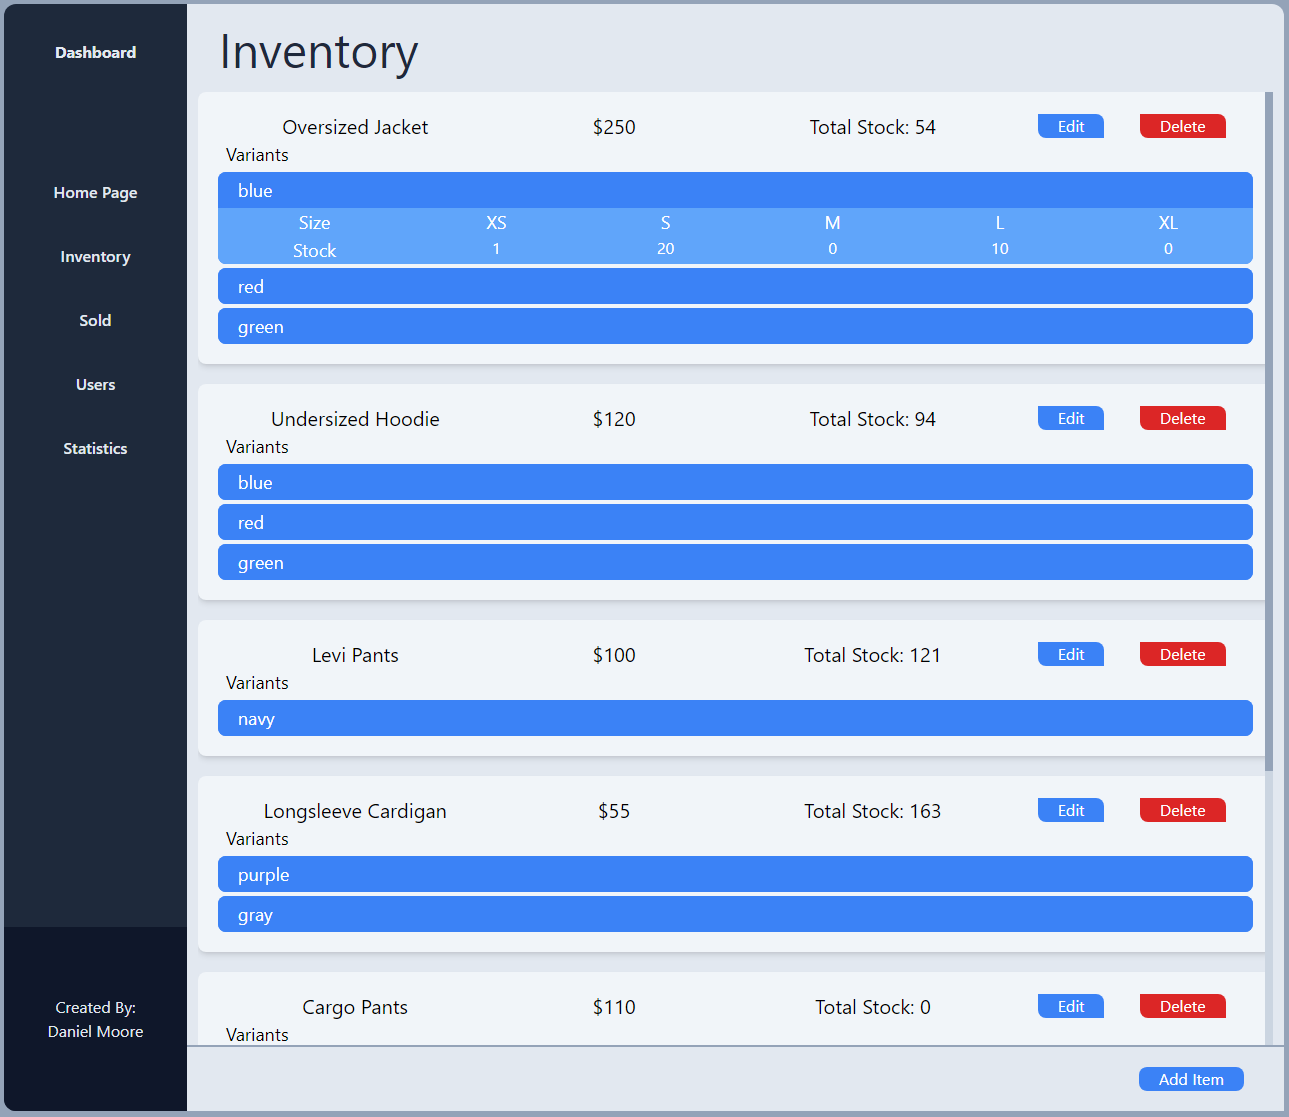
While in the inventory page tab, you will be met with your entire inventory. This includes all of the clothing_item objects you have created as well as their variants/colors. For the first clothing item listed, in order from left to right, you can see the item name, its price, and the total stock. Below that is a list of colors. Clicking on a color will open up a tab displaying all of the current stock numbers and their correlating sizes.
Edit Inventory Modal
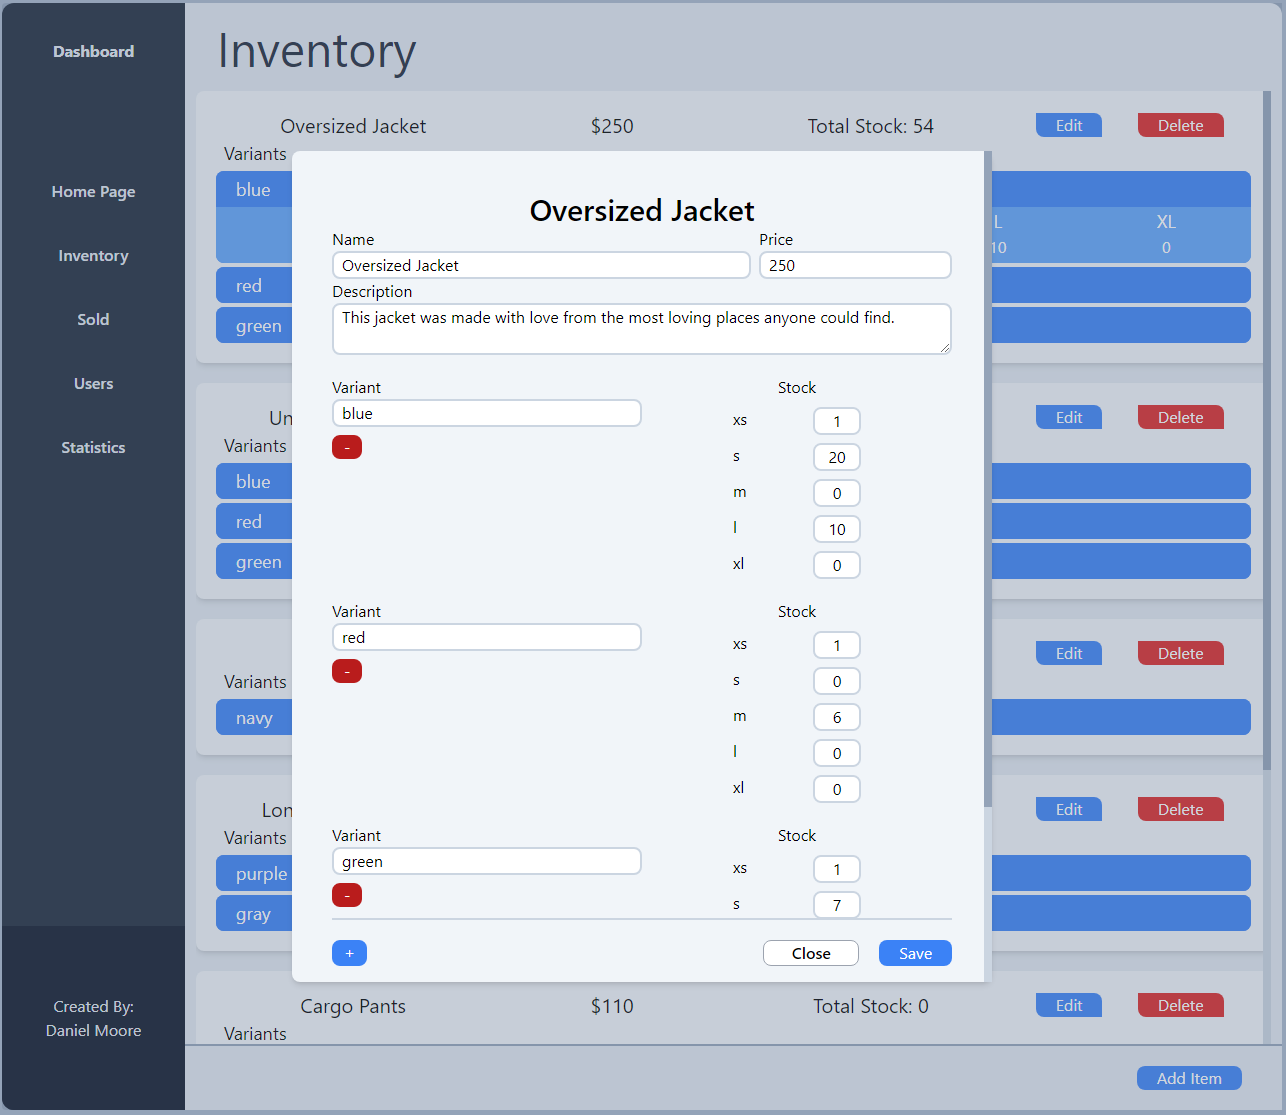
Clicking on the edit button to the far left will spawn a modal with all of the selected clothing item's data. From here you can edit all of the various attributes involved with the creation of a clothing item. This includes colors/variants as well as stock. The way I created the payload to handle this particular method of editing may be a bit far fetched but it is working and works to scale.
To add a color click the plus button in the far most bottom left corner of the modal. Clicking the close button will exit the modal without saving any currently made changes, and clicking the save button will submit the changes made.
Delete Color Modal
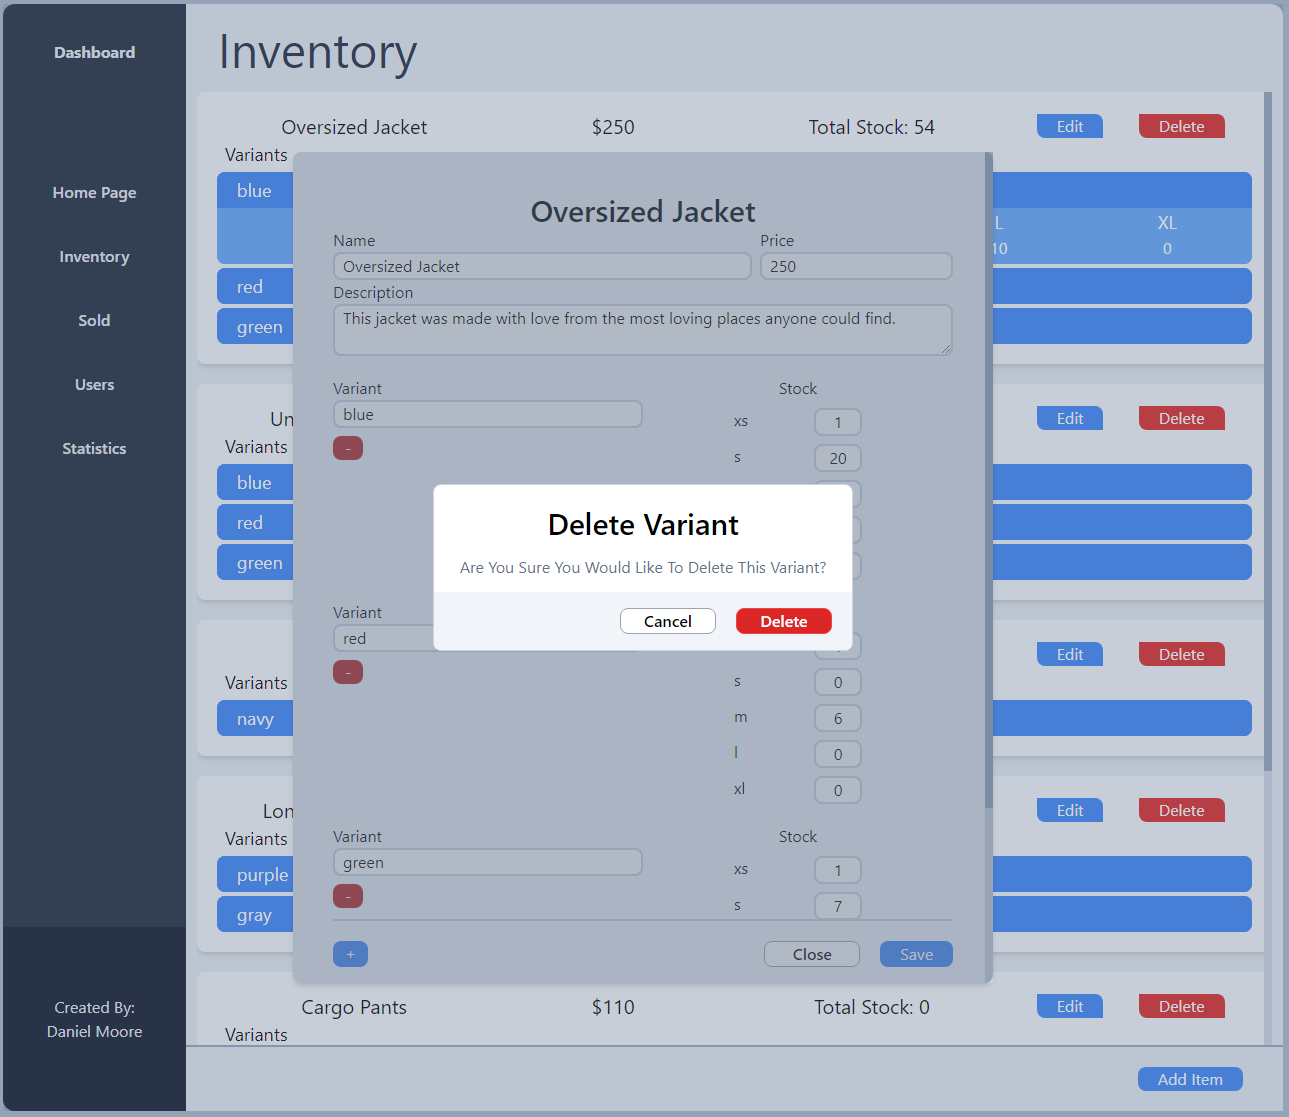
Upon clicking the red minus button found below each color you will be met with another modal asking if you would like to confirm the deletion of the color. Selecting Delete will remove the color and cancel will close the modal without any changes.
Create Item Modal
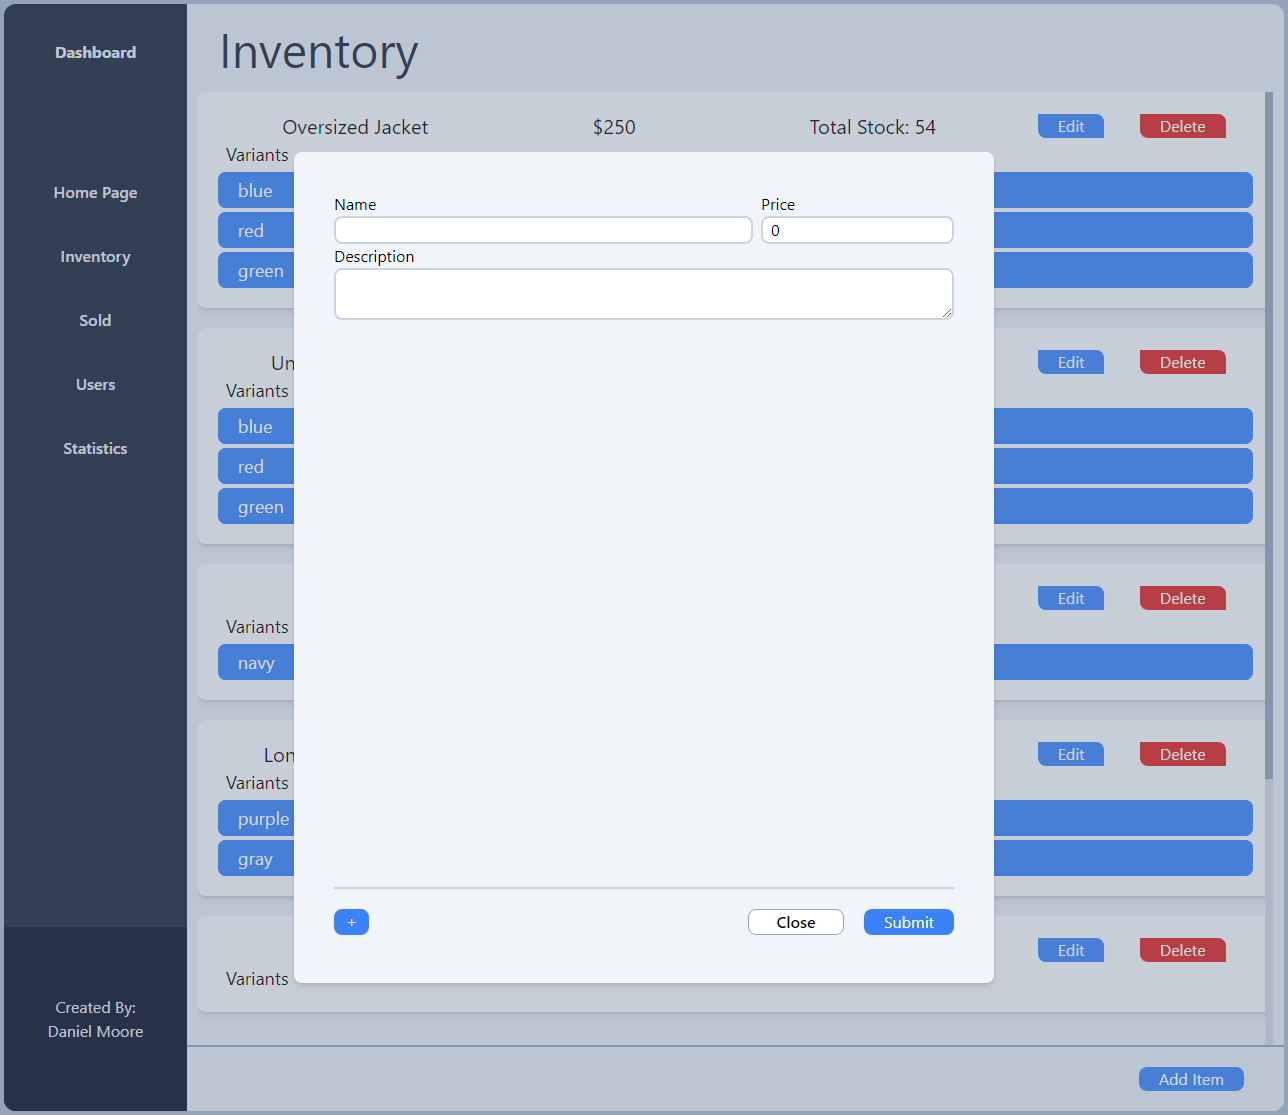
Going back to the Inventory Page and clicking the Add Item button in the bottom right corner you will be met with a modal similar to the Edit Inventory Modal however this one is completely empty and yours to fill out. The functionalities are the exact same between the two modals.
Delete Item Modal

Selecting the Delete button to the right of the Edit button found to the top right of each clothing item will bring up a modal asking "Are You Sure You Want To Delete This Item?". Selecting Delete will remove the selected clothing item and selecting cancel will close the modal without any changes.
Usage - Sold
Sold Page
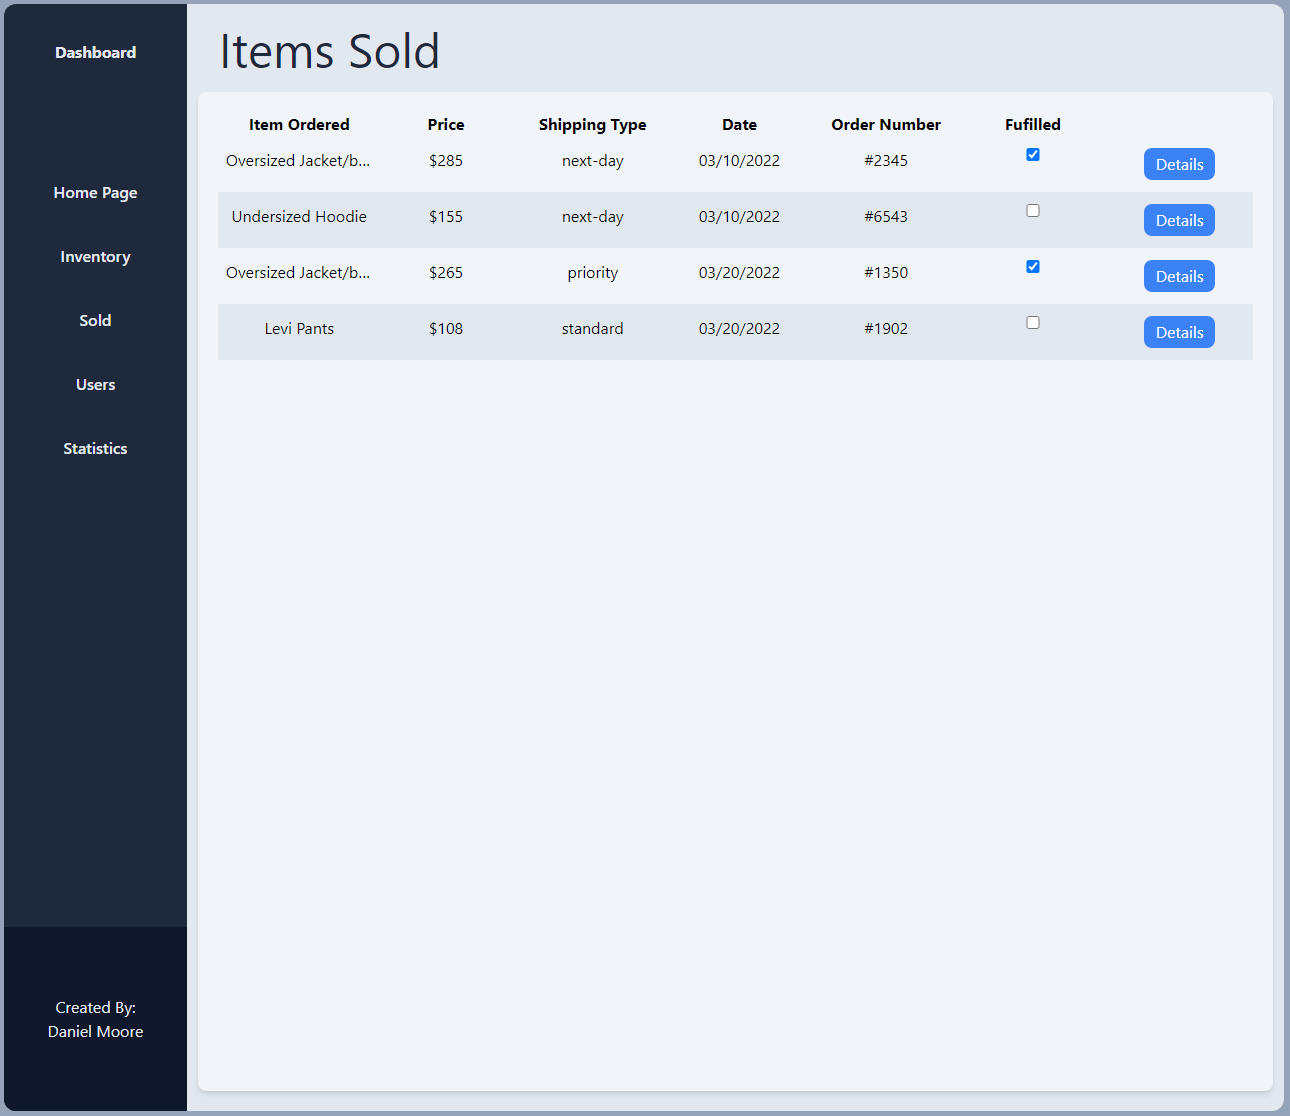
Clicking on the Sold text in the sidebar will take you to the sold page where you will see a listing of all of your sales/orders. In order from right to left you'll see the item name, price, shipping type, date ordered, order number, fulfilled checkbox and a button to click for more details on that order.
Clicking the checkbox to either check fulfilled or uncheck will immediately edit the selected order item. If checked then order_status will be set to true, and if unchecked it will be set to false.
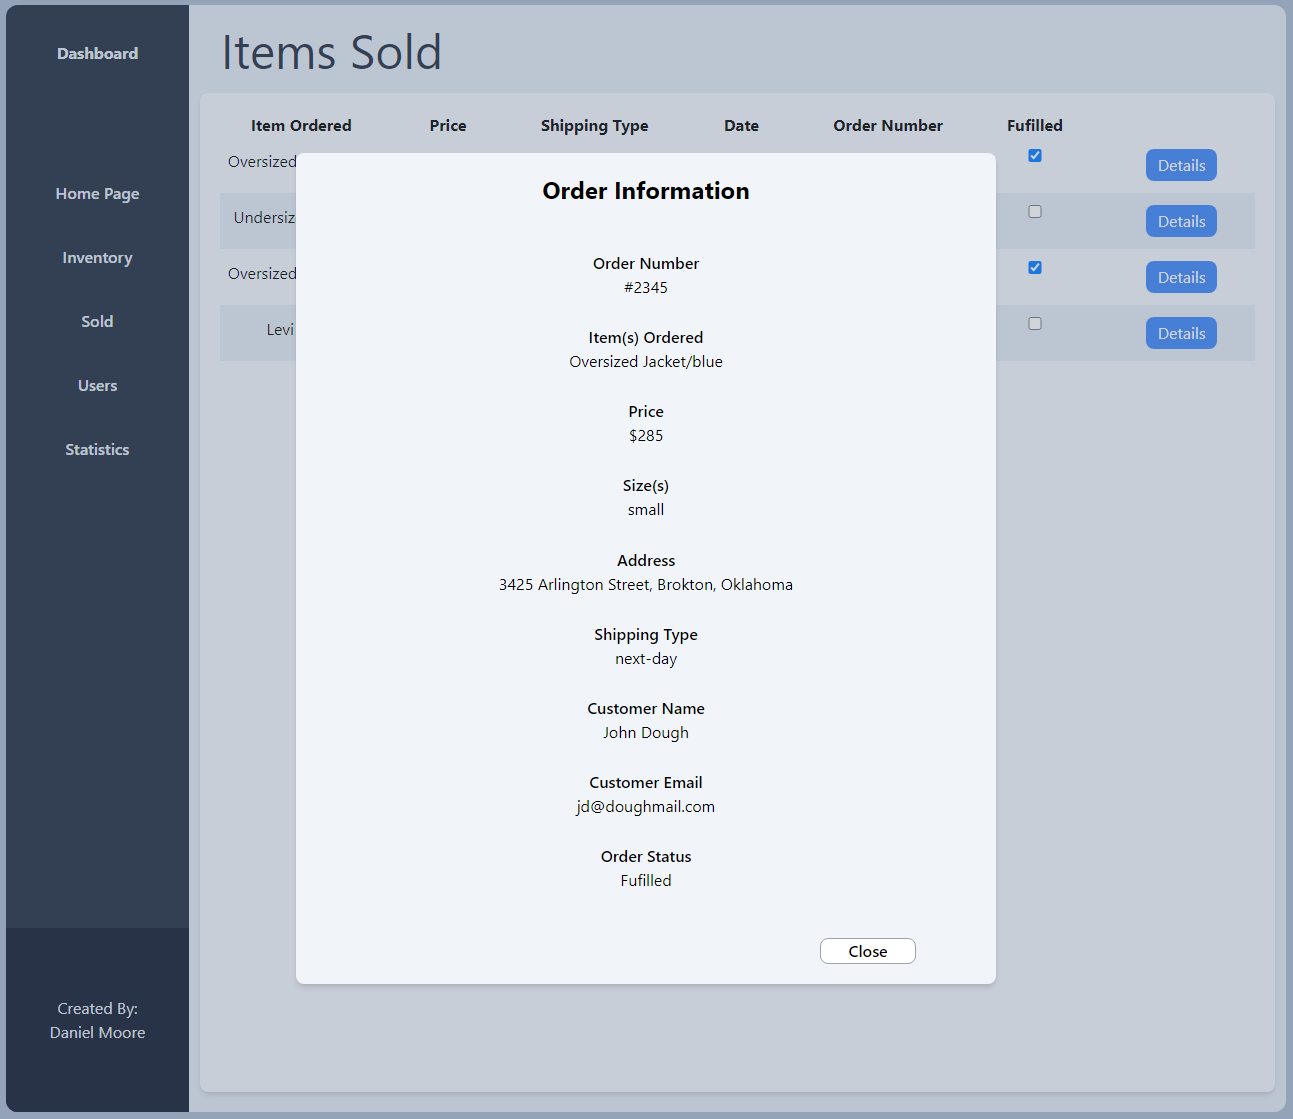
Clicking the Details button at the far right will open up a modal with the information corresponding to the selected order. This shows even more information and is a sort of receipt for the shop owner to view.
Usage - Users
Users Page
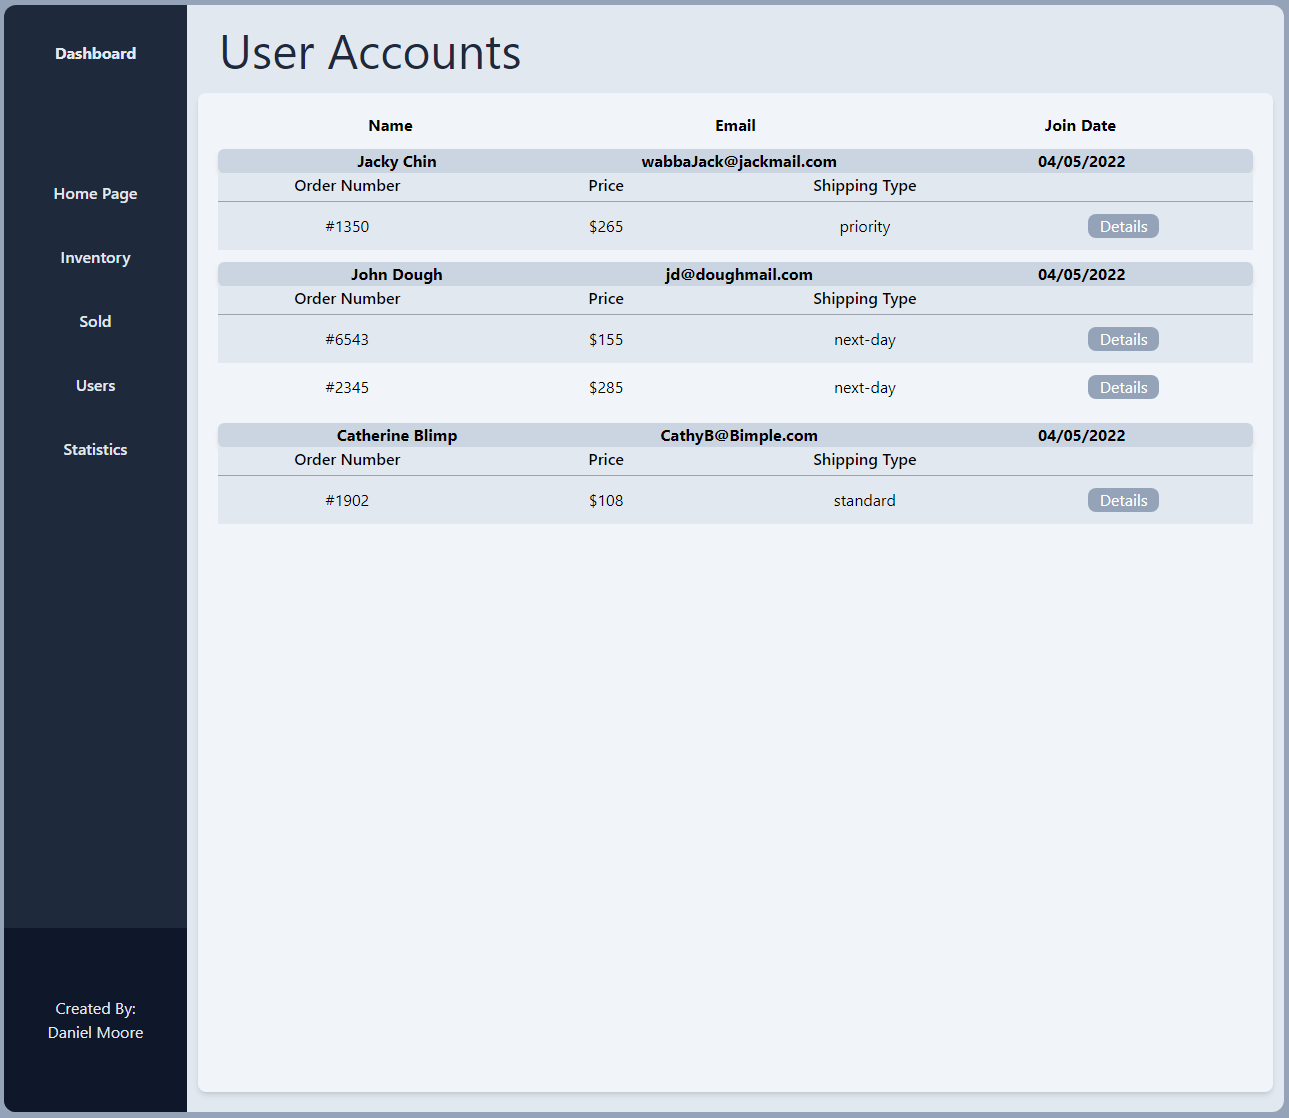
This page lists the users in your store and displays the orders per user. This page is fairly similar to the Sold Page in that it has about the same order information however the top of each section has the users name, email, and join date.
Clicking the details button next an order will open a modal with the same information found in the Sold Page order modal.
Usage - Statistics
Statistics Page
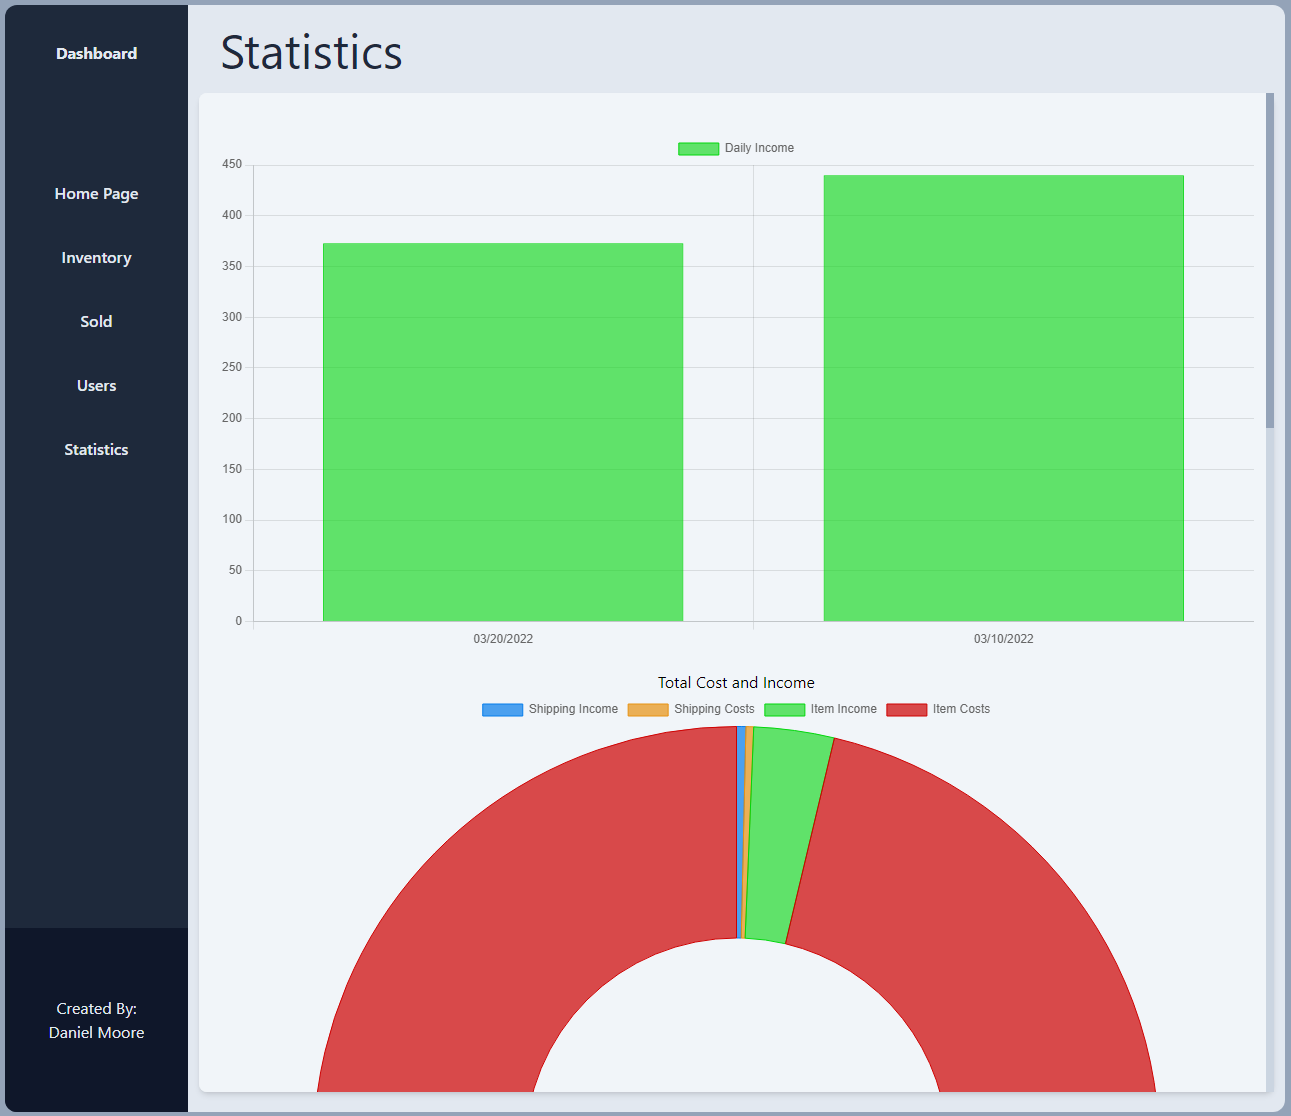
Clicking on the Statistics text in the sidebar will take you to the statistics page. This page displays useful numbers in relationship to sales as well as costs to take into consideration when running your business.
This page utilizes chartjs and react-chartjs-2 to create these really nice looking graphs.
At the top you'll see your income per day and below that you can see your total costs and total income. These numbers are color coded and include the shipping income, shipping costs, item income, and item costs.
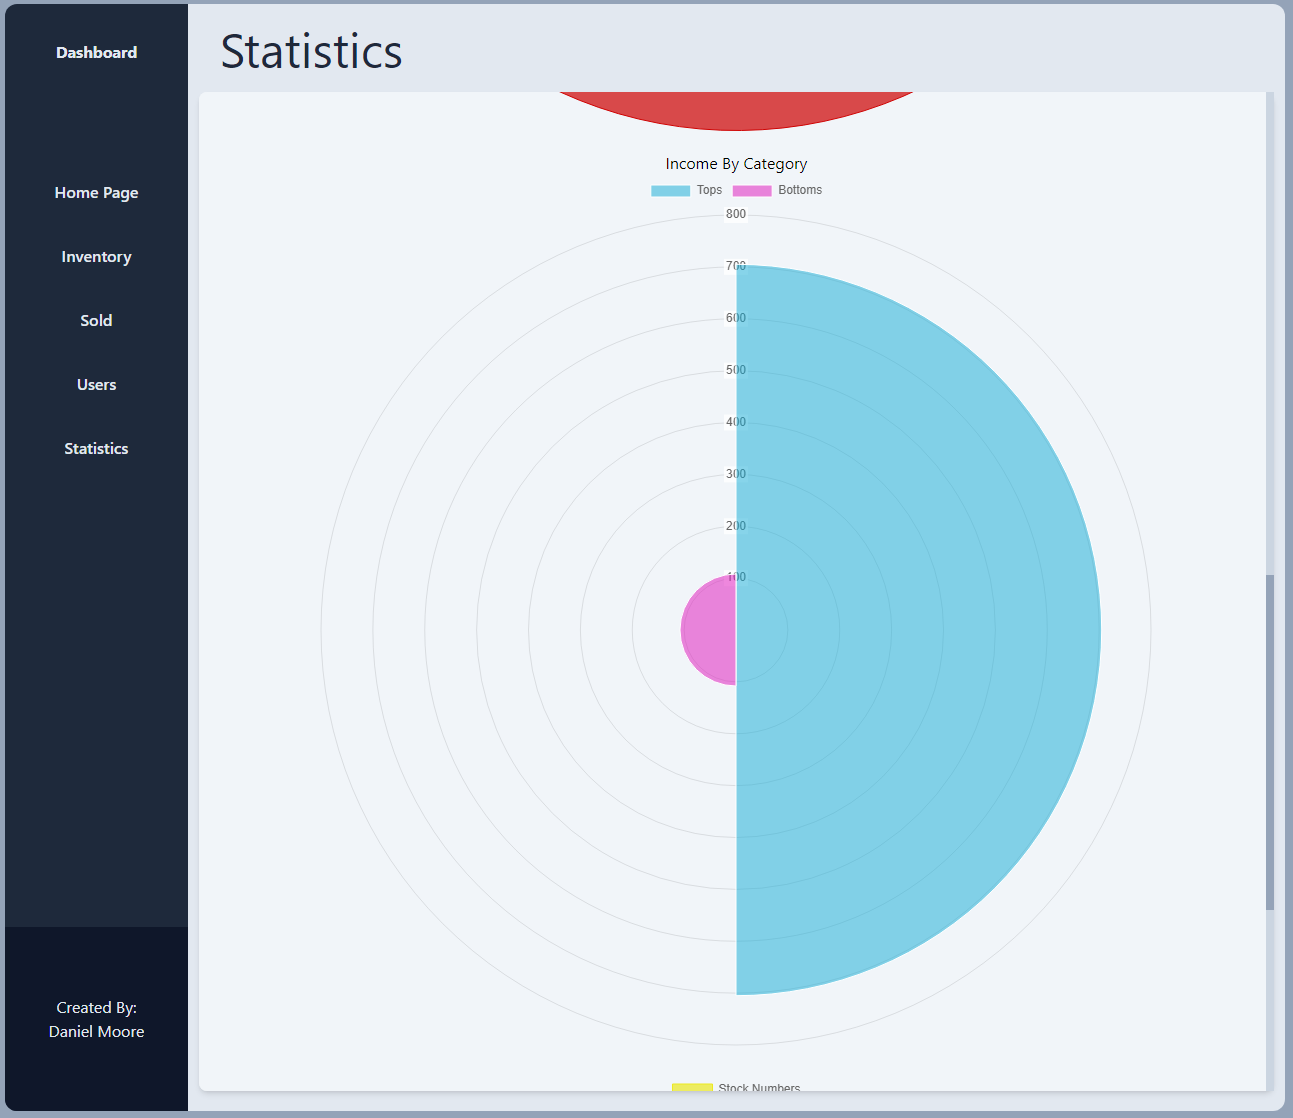
Moving to the middle of the page you'll see income by category. This is displayed in a polar area chart. You can visualize sale percentage as well as view the actual amount from just looking.
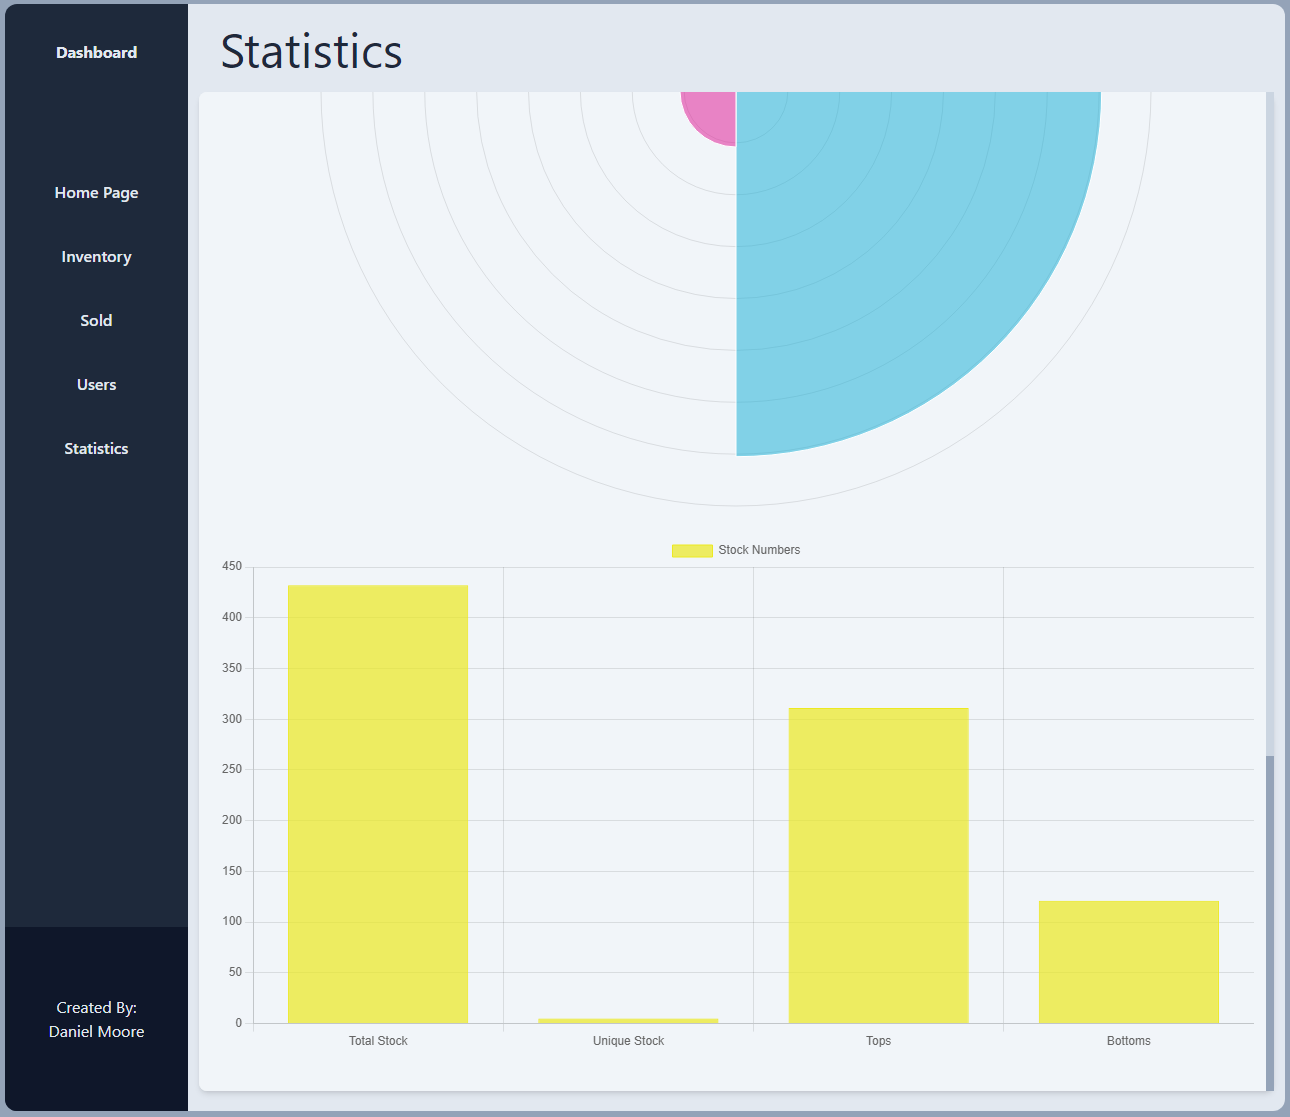
At the bottom of the page is where you will find the stock numbers of all the inventory in your store. Total stock being the culmination of everything you are selling. Unique stock is the amount of individual items you are selling, not including their colors/variants. Then you have your stock per category which is generated based on the categories you have set up.
Usage - Mobile
While there aren't a lot of discrepancies between the desktop and mobile versions of the application there are a slight few.
 The main difference is going to be that the sidebar is now hidden and is controlled by a button in the lower left hand corner. Clicking this button will open up the sidebar and you can navigate through the pages from there.
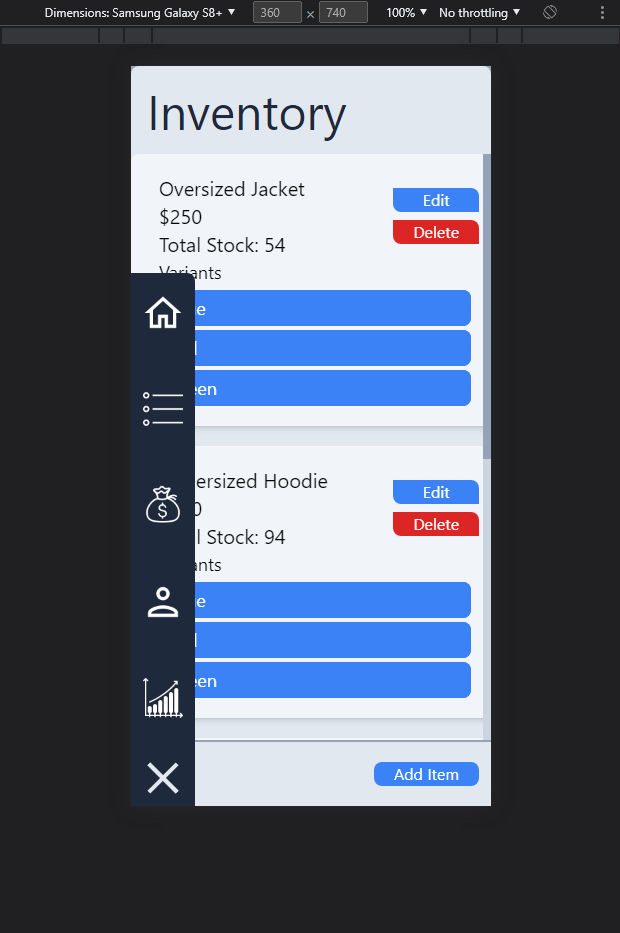
The sidebar layout is the same just instead of text there are now icons representing each page you can navigate to.
Closing
Again I believe I have said this multiple times at this point but this project was extremely fun to work on and seeing its completion is an amazing feeling. Some hiccups along the way were definitely the UI/UX as well as getting chartjs to work alongside react-chartjs-2. The versioning made things a nightmare and I wound up having to just bring in all of the dependencies to get it to work.
It is definitely a breath of fresh air to be finished. I have really learned a lot. Folder structures, database regulation, and I have gotten a much better grasp on tailwindCSS. I am really looking forward to my next project as I'll be contributing to an open source VR project. Creating a backend in Elixir! So that is going to be fun. I have dabbled a little bit in the language and so far I have been able to create a simple http server that can send some date. Really cool stuff and its super quick.
Thank you for reading and I hope you enjoyed. Hope you have a great day!